Sunday, June 19, 2011

Naza/Kia Rondo - ATF Cooler

My Naza-Kia Rondo is about to run out of warranty soon so I decided to go ahead with the long awaited ATF cooler project. We have reports from the field that an ATF cooler would greatly prolong the life of the ATF and Auto Transmission Unit.

First had to remove the radiator. It needed to come out first because the standard ATF lines runs into the radiator. After removing that, out came the front grills. Notice the horns? I need to shift them in order to place the ATF cooler on the left.


Most installers will use cable ties to tie the ATF Cooler to the front air-cond honey comb.(silver mesh looking piece behind the horns) This will normally create a problem when you need to service the air cond as the complete unit will need to be removed to be washed. Also in the long run the ATF cooler may rub against the honey comb and cause it to puncture. So I went with custom made brackets.


Ah Sang(my partner) making the brackets for the RONDO. In total we made 3 brackets to secure the ATF cooler unit. No holes drilled, used the available mounting holes on the car itself.


All done... ATF cooler in place, now just need to remount the horns on the right and spray paint the brackets black...:)


Horns are on... 2.5 hours of work all done.

I will testing the car next week on my trip up to Penang. Stay tuned for my review and see if there is infact a difference.

Ciau!!!!!

Monday, May 2, 2011

My Travelling Gadgets...

I started travelling for work after switching to my first regional role in a multinational company in 2008. I forgot to bring lots of small little stuffs that made my life simpler when travelling during the first few trips. Gadgets, that's what I call them, mainly for work and making life easier away from home.


Here goes.... most important item, either you are travelling for work or pleasure, the travel adapter. If you are travelling within ASEAN be prepared... lots of different types of wall socket outlets within this region. Bring the wrong one and you are screwed, bring too many types you carry a pouch wherever you go...:) So my best pick is the unit below from Wonpro... Small, lightweight and has all the types in one.


Next item... I am sure everyone travels with at least a notebook/laptop. Some laptop adapters can be pretty heavy and bulky. So buy a replacement adapter from ACBEL, these guys make smallest adapters in the market and lightest too. Check it out.... less then 300grams and slightly bigger then a wallet. These adapters are normally 2 pin sockets, when used with the above travel adapter you will still have 1 more 3 pin socket left. Neat, so now you can plug in a second device into the travel adapter.


3rd item... regional job means lots of calls. Either via skype, softphone or via the handphone... some of these calls can last up to an hour or so...:( so you need a handsfree kit. Nope not the one that plugs into your ear. That's good for a 5 min conversation but not a 60min conference call... So get yourself a bluetooth handsfree car kit system. It's small, it's light and it's bluetooth...


4th item... small but very useful... everyone travels with at least 1 USB cable. Short or long is entirely up to the individual. Now if you have a newer generation phone you will realise that it uses micro USB and some of your other devices(like the bluetooth handsfree above) will still be using the older mini USB. So you bring 2 cables??? Nope... you get this... mini to micro USB converter and try to get one with a lanyard and tie it around your cable so you won't lose it.


There are always surprises when you travel and one of them would always be a dead phone because you have been busy SMS/emailing while you wait for your flight and realised that you have used up all your juice. So item 5 is... backup battery charger. It's able to charge my Samsung Galaxy S 2 -3 times and it's good to power the next important gadget too... Also do travel with the provided USB power adapter(left of the picture) as it can plug into the travel adapter easily to charger anything on USB 5Volts.


Next up... internet, without it... I would be dead, at least when I am working...:) The problem is when you are travelling you can have various kinds of access. 3G if you have a local SIM CARD, hotel broadband which normally comes in either wired or wireless. So it's always better to travel will a router. Best if the router can do everything... I have one, I call it the king of travel routers. The Sapido pocket size router does everything from wired/wireless router, wifi repeater, wifi adapter, 3/4G with USB stick and best of all USB powered... so if you have the item above you can power it on the go...


Last item is very important, a clone of your current HDD contents, all in a USB thumb drive and make it bootable so you can reload everything. USB thumb drives are pretty big capacity nowadays and can fit almost all your 'business' info including your OS. I have seen some cases were travellers are hit with a corrupted hard drive and you will be stuck if you don't have a backup. If you are on an SSD, you ought to have a complete hard drive with you. When SSD goes down, 90% of the time it's dead and there is no reformating or cloning. The only option is to swap the drive out with a new one.


Once you have all the above items you should be safe 99% of the time travelling and you will be ready for almost anything. IMHO if you do lots of travelling, buy a lightweight notebook, something that weights less then 1.7Kgs... there are lots of options out there. Light and powerful but it doesn't need to break the bank. Travel light but travel smart... that's the key.

Sunday, August 22, 2010

Car Computer.... in short carputer... Part 2, OBD Test

Decided to continue with the carputer testing. Bought an OBD2 reader unit from ebay, ELM327 with USB interface. Installed a copy of Centrafuse Auto to my Lenovo S10-3T to simulate the carputer as my 2DIN touch interface has not arrived...

The OBD2 reads all kinds of data from the RONDO's OBD2 port located just below the steering wheel. It will also read out error/malfunction codes if there is something wrong with the engine. I believe it is a nice piece of device to have....

Below is the video of how it works.

Saturday, July 24, 2010

New Home and upgrade of capacity for my WHS....

My WHS(please refer to my first posting) was running out of space physically and HDD wise. Therefore it's time to shift to a new chassis. I bought a front meshed Cooler Master casing and transplanted all the components over. I also bought 2 units of additional HDD caddies, thought of saving both time and money I ordered them locally thru lelong.com. When it arrived I was shock to find that it wasn't black in color and it was different from my previous one ordered from HK.


Things that were wrong :-
1.) Color is not black (SHIT)
2.) Power and SATA cable is part of the caddy and cannot be replaced. (MORE SHIT)
3.) When plugged in only SATAI 150Mbps is supported not SATAII. Motherboard just hangs during boot up. (F**KING SHIT)

Well since I have bought it no choice have to use it first, I am planning to change this but laterlar... the caddy only works connected to my SATA PCI card so no choice have to switch the HDDs around.


Transparent casing & ample amount of space in the new home. I also upgraded the HDD capacity to :-


750Gb + 1.5Tb + 2Tb = 4.25Tb (WOW....)


Next up... my gaming rig...

stay tuned....

Friday, July 16, 2010

My Homemade Blu-ray/DVD/Media/Misc Flexible Player...(from mainly used/old components) PART 2

It finally arrived, the ASUS GT220 1GB DDR3 low profile card.


It came with both a full size bracket and also a low profile bracket. The low profile bracket occupies 2 slots. The heat sink was pretty huge too. Next put it into the motherboard.


Good clearance and also the chassis has ventilation slots on this side. Air flow to keep the whole unit cool is not an issue... GREAT!!!!

The finished piece....


Finally the hardware portion is done... the next chapter would be the software... here is what I planned... base OS is Windows 7 Ultimate therefore will run Media Center. For Blu-ray playback will use Cyberlink PowerDVD. Just need to know if the remote works in PowerDVD and whether if I can run PowerDVD from within Media Center.

Stay tuned....

Tuesday, July 13, 2010

My Homemade Blu-ray/DVD/Media/Misc Flexible Player...(from mainly used/old components) PART 1

End of the quarter has just passed, that's why I didn't have any updates last month. Now as we are starting a new quarter I have a little time on my hands and it is starting to itch again. I recently visited Brunei a few times on business and stayed in Rizqun Hotel which is next to a mall. I found pirated Blu-rays at RM40 each and bought 2 pieces back home. I was playing it on a loaned Blu-ray player and the video was fantastic. So I thought about getting a blu-ray player myself, to my surprise it was still expensive and if you needed one with all the 'KAU' features you have to be prepared to pay more then RM1,200.00.

Digging around the internet I found articles on building your own media player and surprisingly you can have a Blu-ray drive and transform it to a Blu-ray player with all the features that you will need. So the adventure begins.

I had an old HTPC(home Theater PC) casing, dug it up and cleaned it...


Could only take a u-ATX board and a low profile video card. I happen to have an old ASUS M3A78-CM and AMD LE1600 - 2.2Ghz single core 45W CPU. So got it fitted...


So lucky I still have a low profile Cooler Master CPU heat sink. As you can see it is a pretty tight fit once the Blu-ray drive is installed with the rest of the items.


Now still waiting for my low profile video card to arrive. No doubt the Asus MB comes with a built in video GPU but it isn't powerful enough to support Blu-ray playback. Therefore I opted for a GT220 low profile card, most probably from ASUS to help with processing the HD streams from a Blu-ray. It should arrive shortly...

This project should be done within the week as I have everything up and running including the software (Windows 7 Ultimate and Cyberlink PowerDVD) also I am using the media center remote from my old HTPC. I recycled most of my components so total cost should be very low to me...:)

Cost analysis for this build :-

Recycle items
HTPC casing - Recycle (RM0), if new (RM200) Aopen G326 casing
Power Supply - Recycle (RM0), if new (RM100) Don't need anything fancy
Motherboard Asus M3A78 - Recycle (RM0), if new (RM150) ECS A740GM
DDR2 2G - Recycle (RM0), if new (RM140) Apacer DDR2-800
Processor AMD LE-1600 - Recycle (RM0) if new (RM110) AMD Sempron 140
HDD 160Gb - Recycle (RM0), if new (RM130) WD 160GB
Media Center Remote Control - Recycle (RM0), if new (RM75) 3rd party

New items
Blu-Ray Combo Drive - LiteON (RM360), if you opt for a normal drive it is around RM260
Low Profile GT220 Video Card - Asus (RM265)

Total cost to build this for myself (RM625)

Total cost to build this if you don't have any recycle components (RM1,530)

Yes it's expensive if you are starting out fresh but you get the flexibility to do anything with the HTPC with Blu-ray, even playing some normal games. If you are opting for the Aopen casing look for a better video card as you are not restricted by the size. This way you can have a HTPC and gaming rig all in one...

Tats all... next update when I get my video card...

Saturday, June 5, 2010

Sepang 300km... 3 days before...

This year we took a back seat to Sepang 300KM race(today). Due to info that Sepang will no longer accept cars older then 5 years old to enter into the race next year, everyone was skimming on car preparation budget. Our team only entered 1 car and it was not fully prep by us(NA GARAGE), we only took care of the engine this time.

But here are some of the pics 3 days before the race during trials and run in.


The 6 year old car... finished 1st, 2nd and 3rd in the previous years.


This year the sponsor for the tires were FEDERAL.. RM350 per piece, sounds more like daylight robbery to me... at that price I can buy semi slicks like these ones from tire shops in Klang. Taiwanese tire manufacturers it seems... check them out here http://www.federaltire.com/en/html/global.php


Current Project(Workshop) Honda EG...

I have temporary stopped must of my personal projects because quarter end is coming for me and I have to focus on bringing in my numbers first. But since I am not involved physically in my workshop, projects are still running over there... so here is the update.

Our latest project car sent from up north has been completely striped down. Pictures below :-


Whats going in? Brief list below :-

1.) B20B with custom 2.2 liter stroker kit
2.) B16A Type R Head, cams and inlet manifold
3.) B16A ECU with upgraded chip
4.) B16A Type R wiring
5.) Re-worked gear ratio gearbox
6.) Complete internal re-upholstering
7.) Complete midnight black 2K paint job
8.) Sparco competition seat
9.) Lightweight SSR imported rims
10.) Carbon fibre body panels

Shit load of work and upgrades, we estimate a completion time of 2 months for this baby...:)

Saturday, May 29, 2010

RONDO's outstation fuel consumption.... 9.2l/100km

Recently I took my family to Pangkor Island for a 4 day getaway. Needed the break after a long and tiring 1 and 1/2 quarter in 2010. I took the opportunity to test the RONDO's fuel consumption, the trip to Pangkor from Mutiara Damansara was roughly 240km with 130km on the north-south highway and the remaining 110km on smaller rural roads from Bidor to Lumut. Speed limit was kept at 110km/h on the highways and around 70 - 90km/h on the rural roads. There were some traffic on the rural roads but most of the time it was pretty clear. Only managed to overtake a handful of cars and lorries, so it should not affect the fuel consumption too much.

Upon reaching McDonalds just before Lumut Terminal(roughly 10 mins away) the RONDO's trip meter read :-


A pretty impressive 9.2l/100km. For a car that has a 2.0 liter engine and a weight of 1.6T without cargo, i think it is pretty impressive. So I could actually make a round trip without filling up(fuel tank is 55 liters).

Oh yeah, on the top right corner is my trusty Nokia 5800 with NOKIA MAPS(now free with latest firmware and also includes voice navigation). Pretty accurate but runs the battery dry really fast. I was on full charge before I left the house and by the time I reached Lumut ferry terminal it was almost dead with 1 bar left. Guess I should have charged it in the car all the way.

So that's it folks... hopefully by the next RONDO related post you will see it doing BELOW 9l/100km. I have a trip coming up in June to Malacca, hopefully by then the mods will be in.

Stay tuned....

Saturday, May 15, 2010

Car Computer.... in short carputer... Part 1

I have been toying around with the idea of fitting a car computer aka carputer in the RONDO for a long time. I was slowly buying parts and checking out individual items that would make this project feasible.

First I bought an ITX casing from lelong.com.my. This is one of the best place to search for good bargains and also check out prices before I head to the stores. I saw a Mini ITX Slim Casing - E-2011 and immediately bought it. Why? The casing comes with a 12V power supply and adapter, this would allow me to use this casing and its contents inside a car without modifications.


This is a picture of the 12V power supply board that comes with the casing.


Next I fitted a ITX ATOM 330 board, this is the same model as the one that I used for my Windows Home Server Project. Looks good but the wires are everywhere... most of them too long, specially the SATA cable.


As you can see the ITX ATOM 330 board is fully equipped in terms of connectivity. Take note that this particular unit has a S-Video out too. Very useful for rear LCD monitors for my kids.


Front of the casing and the provided power adapter. Looks good...

I used to have a 64G SSD Kingston V drive for this project, but I installed it into my LENOVO S10-3T tablet netbook recently. So I have to get another one, might look for a V+ version now as it is much faster and swap with the netbook.

Next I have also order a 2 DIN RONDO mount to replace the current factory radio. It should arrive in a week's time. That will be part 2... so stay tuned.

Sunday, May 9, 2010

Earth/Ground Wire Custom Install on RONDO

Alright, as promised RONDO's Earth/Ground Wire Custom Install was done today within 3 hours. Just enough time during my kid's nap again.

First, I purchased some cables from the local hardware shop. You should ask for arc welding cables, last I checked it came with multiple sizes and prices too. Normally can be purchased based on per meter. I opted for the 400AMP cable which looks good and thick.


Made in Thailand and has an average of 16mm in diameter thickness(outer), inner core thickness is 8mm. Pretty heavy too...

Next you will need at least these tools to work on your wires.
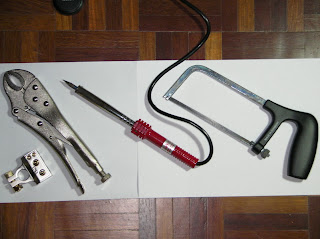


You will need to hacksaw to cut the wire, regular wire cutters don't work too well with the thickness and tough outer insulation. A high wattage soldering iron to solder the wire.(at least 60W and above) A clamp to make sure you hold the wire properly when you solder.

Here is a picture of a custom cable according to the needed length.


As you can see I only terminated one end to the gold plated brass terminal that I bought earlier last week. The other end is a soldered core to make sure the core does not come apart. This is important so that the core can sit into the negative terminal post and be tighten down with minimal flex.

Next we move on to the RONDO... have to dismantle lots of items battery, intake air hose, air filter and box assembly, ECU!!!!, Air flow sensor, etc....
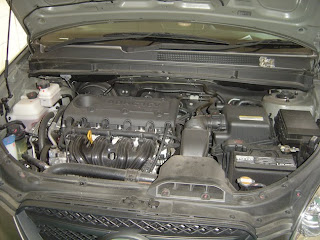


There the RONDO's engine bay...


Original NEGATIVE terminal bolted to the body...


Removed the battery.... you can still see the original battery terminal. I need to remove everything to get to the bolts holding the terminal down.


Removed the battery tray and the terminal mounting bolts. Bolts were tight and there were 2 bolts holding the terminal down. Sprayed some WD-40 and started looking around to see if there are any bolting points that I can use.


The original Terminal had a 2 bolt flange on it... so I decided to reuse and cut the flange out.


All done... need to reuse that flange to put the custom cable.

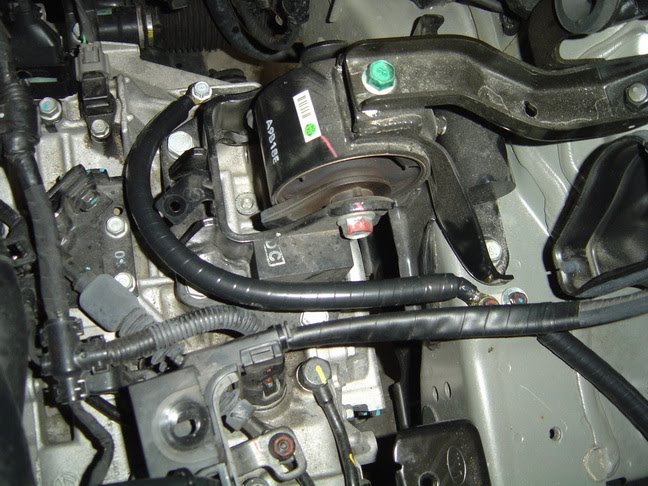
While I was looking around I found another grounding cable and it was grounding the chassis to the engine. If you don't already know, the engine is actually isolated from the chassis ground because it sits on 4 rubber engine mounts. Therefore it is vital that the engine also needs a good grounding system.


This cable is directly below the airfilter assemble so I have to dismantle the whole unit to get to it. This included the ECU, airfilter housing, airflow sensor and some vacuum tubes. Newer cars now have the ECU installed in the engine bay to save cost by reducing wiring. But I doubt the ECU would be reliable in the long run as it is very HOT in the engine bay. The RONDO has the ECU attached to the airfilter assembly and it is exposed to the incoming air. I believe this is a way to cool the unit.

Next we wire up with the new custom cables.


I decided to pull the engine grounding cable directly to the battery terminal. This should give it optimal grounding.


Now to put everything back and to install the new battery terminal...


Battery terminal fitted and installed... JOB DONE!!!!!! Now for the result :-

You wouldn't believe it, the dimming of the headlights when the air cond switches on has now been reduced, to the point that you really need to stare at the headlight reflection and be really still in order to catch it happening. Before this, it was visible even if you glance at the reflection on the wall at the right moment. I am really satisfied with this custom cable, it cost me only RM56 to build my own cable and make it look custom AND IT WORKS!!!!

I believe the problem is with the engine grounding cable, after a close inspection I found that this cable is not a single 'thick core' cable. Instead it was like 4 - 6 regular wires solder together and made to look nice with a thick insulation.

After poking around I will look into making 2 more cables... here are the locations


This is located on the left side of the engine bay, again it connects the engine to the chassis for ground. Same cable as the one that I replaced, touched it and it feels like 4 - 6 wires soldered together to give a thick cable look. DON'T BE FOOLED by the external looks...


This one is right next to the ECU and airfilter assembly. It looks like the termination point for the sensors and the ECU. I am planning to run another wire directly to this location. Because of the tight space I will not be using the ARC WELDING cables, instead I will look for some power amplifier cables from the local CAR AUDIO shops...

I am also thinking of making my own capacitor unit like this one below from RAIZIN for my next project but might max on the capacitors and see how many I can fit and put in a Voltage Monitor too if space permits...


So stay tuned for more folks....