First, I purchased some cables from the local hardware shop. You should ask for arc welding cables, last I checked it came with multiple sizes and prices too. Normally can be purchased based on per meter. I opted for the 400AMP cable which looks good and thick.

Made in Thailand and has an average of 16mm in diameter thickness(outer), inner core thickness is 8mm. Pretty heavy too...
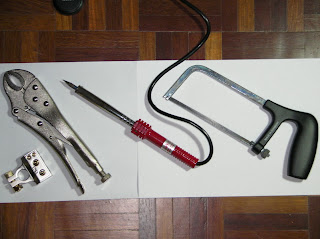
Next you will need at least these tools to work on your wires.

You will need to hacksaw to cut the wire, regular wire cutters don't work too well with the thickness and tough outer insulation. A high wattage soldering iron to solder the wire.(at least 60W and above) A clamp to make sure you hold the wire properly when you solder.
Here is a picture of a custom cable according to the needed length.

As you can see I only terminated one end to the gold plated brass terminal that I bought earlier last week. The other end is a soldered core to make sure the core does not come apart. This is important so that the core can sit into the negative terminal post and be tighten down with minimal flex.
Next we move on to the RONDO... have to dismantle lots of items battery, intake air hose, air filter and box assembly, ECU!!!!, Air flow sensor, etc....

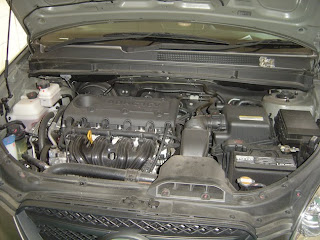
There the RONDO's engine bay...

Original NEGATIVE terminal bolted to the body...

Removed the battery.... you can still see the original battery terminal. I need to remove everything to get to the bolts holding the terminal down.

Removed the battery tray and the terminal mounting bolts. Bolts were tight and there were 2 bolts holding the terminal down. Sprayed some WD-40 and started looking around to see if there are any bolting points that I can use.

The original Terminal had a 2 bolt flange on it... so I decided to reuse and cut the flange out.

All done... need to reuse that flange to put the custom cable.
While I was looking around I found another grounding cable and it was grounding the chassis to the engine. If you don't already know, the engine is actually isolated from the chassis ground because it sits on 4 rubber engine mounts. Therefore it is vital that the engine also needs a good grounding system.


This cable is directly below the airfilter assemble so I have to dismantle the whole unit to get to it. This included the ECU, airfilter housing, airflow sensor and some vacuum tubes. Newer cars now have the ECU installed in the engine bay to save cost by reducing wiring. But I doubt the ECU would be reliable in the long run as it is very HOT in the engine bay. The RONDO has the ECU attached to the airfilter assembly and it is exposed to the incoming air. I believe this is a way to cool the unit.
Next we wire up with the new custom cables.

I decided to pull the engine grounding cable directly to the battery terminal. This should give it optimal grounding.

Now to put everything back and to install the new battery terminal...


Battery terminal fitted and installed... JOB DONE!!!!!! Now for the result :-
You wouldn't believe it, the dimming of the headlights when the air cond switches on has now been reduced, to the point that you really need to stare at the headlight reflection and be really still in order to catch it happening. Before this, it was visible even if you glance at the reflection on the wall at the right moment. I am really satisfied with this custom cable, it cost me only RM56 to build my own cable and make it look custom AND IT WORKS!!!!
I believe the problem is with the engine grounding cable, after a close inspection I found that this cable is not a single 'thick core' cable. Instead it was like 4 - 6 regular wires solder together and made to look nice with a thick insulation.
After poking around I will look into making 2 more cables... here are the locations

This is located on the left side of the engine bay, again it connects the engine to the chassis for ground. Same cable as the one that I replaced, touched it and it feels like 4 - 6 wires soldered together to give a thick cable look. DON'T BE FOOLED by the external looks...

This one is right next to the ECU and airfilter assembly. It looks like the termination point for the sensors and the ECU. I am planning to run another wire directly to this location. Because of the tight space I will not be using the ARC WELDING cables, instead I will look for some power amplifier cables from the local CAR AUDIO shops...
I am also thinking of making my own capacitor unit like this one below from RAIZIN for my next project but might max on the capacitors and see how many I can fit and put in a Voltage Monitor too if space permits...

So stay tuned for more folks....
No comments:
Post a Comment